Part 2: Getting Started
Your First AI
Step 1: Install Horizon Tech package
- For Unity versions earlier than 6, install the Unity ML-Agents Extensions package; otherwise, proceed to Step 2.
- Open the 'Windows' tab and choose 'Package Manager'.
- Click on the '+' icon on the top left corner.
- Choose 'Install package from git URL'.
- Enter following link:
https://github.com/Unity-Technologies/ml-agents.git?path=com.unity.ml-agents.extensions#release_22 - Click 'Install'.
- Follow the same substeps as above (open the Package Manager, click the '+' icon, select 'Install package from git URL') and enter this link:
https://github.com/Horizon-AI/Horizon-AI-Unity-Package.git
Step 2: Creating the Agent
Let's turn any GameObject into an AI agent.
- Open the Horizon Tech > Setup Playtest Agent window.
- From the hierarchy window select the GameObject that represents the player in your game, and click the "Setup Selected GameObject as Agent" button.
Instantly, six components are added to your GameObject: Playtest Agent, Playtest Observer, Player Input, Decision Requester and Behavior Parameters.
Step 3: Giving Your Agent Senses
Let's make our agent aware of its own environment using the playtestObserver component. This component enables you to send values of variables to the AI.
The following steps need to be applied to each relevant vector observation. As an example, we'll illustrate it for the player's position in playerController.cs below.
- Add
ObservableAttributeto the variable that you want to share its value with the AI, by writing[Observable]on the line before declaring your variable. For example:[Observable]
private Vector3 currentPosition;NOTE:Make sure you add the "using Unity.MLAgents.Sensors.Reflection;" statement at the top of your C# (.cs) code file, e.g.
playerController.cs. - On the
playtestObservercomponent, click on the "Add component to Observe” Button. - Drag the GameObject that your script is attached to into the game object field (
playerController.csin this example). - Choose the script from the “Script to Observer" drop down.
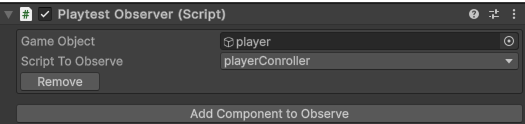
Now the playtest agent is aware of the player position.
Depending on the complexity of your game scene there might be a need for adding a visual observation. In the reviewing process of your game by our team, the required type of visual observation will be identified. In that case, there would be one additional component to attach to the agent GameObject without need for any script customization.
Step 4: Giving Your Agent Actions
The Player Input component turns agent decisions into actions in your game using Unity's input system.
-
If you have already setup an
InputActionAssetskip to Step 2, otherwise follow these substeps:- Create an
InputActionAssetto allow your Agent to be controlled by the Input System.- In your "Project" window, right-click and go to Create > Input Actions.
- Name this new asset "PlayerInputActionAsset."
- Assign
PlayerInputActionAssetto the Action field of the Player Input component
- Define Actions and Bindings:
- Double-click the "PlayerInputActionAsset" to open the Input Actions editor.
- Action Maps: On the left, you'll see "Action Maps." Click the "+" to create a new one and name it something like "Player." Action maps are groups of related actions.
- Actions: In the middle column, click the "+" to add new actions under your "Player" action map. For example, you could create a "Move" action for player movement and a "Jump" action.
- Bindings: For each action, you need to add bindings in the right-hand column. A binding links an action to a specific input, like a key on the keyboard or a button on a gamepad.
- For the "Move" action, you might add a "2D Vector" composite binding to handle WASD or arrow key input.
- For a "Jump" action, you could bind it to the "Space" key.
- For more detail please check Unity's documentation on Configuring Input with the Actions Editor.
- Connecting actions to methods or callbacks:
You can use the Behavior property in the Player Input component to notify game code when something related to the player has occurred. By selecting
Invoke Unity Eventsas Behavior, the events from the PlayerInput are accessible in the Events foldout. You can assign the respective script and a separateUnityEventfor each action.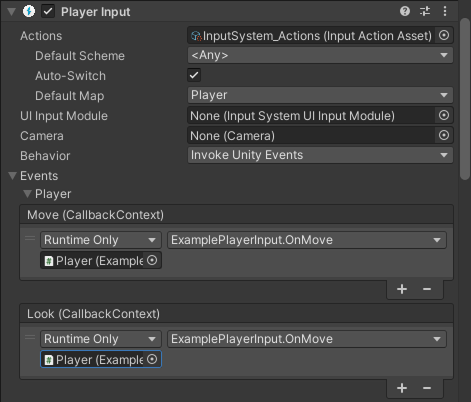 For more details or other types of Behavior (i.e. Invoke C# Events), please check Unity's documentation on notification behaviors.
- Create an
-
In the Inspector of the
.inputactionsAsset, tick the Generate C# Class checkbox in the importer properties, then select Apply.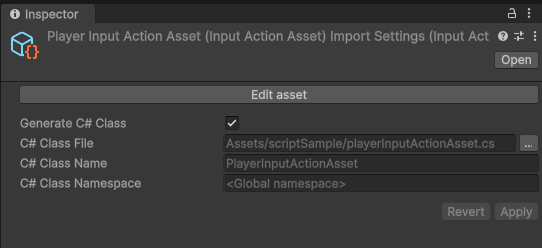
-
Modify your player script to use
IInputActionAssetProvider- At the very top of the script, add:
using Unity.MLAgents.Extensions.Input;
using UnityEngine.InputSystem;- Change the class declaration line to inherit the interface:
public class playerConroller : MonoBehaviour,
IInputActionAssetProvider- Inside your class, you need a variable to hold an instance of the
PlayerInputActionAssetclass that Unity generated for you. Add following lines inside the class:
PlayerInputActionAsset m_InputActionAsset;

void LazyInitializeActions()
{
    if (m_InputActionAsset != null) {
        Return; }
    m_InputActionAsset = new PlayerInputActionAsset();
    m_InputActionAsset.Enable(); }

//provides the input asset to any other component that asks for
it.
public (InputActionAsset, IInputActionCollection2)
GetInputActionAsset() {
    LazyInitializeActions();

    return (m_InputActionAsset.asset,
m_InputActionAsset); } -
Add Input Actuator component to the Agent GameObject.
Step 5: Defining the end of the episode
The agent must be notified when it reaches a termination condition in your game, for example, wins or loses. In order to notify the agent, apply the following in the script that handles terminal state in your game logic, for example gameState:
- Add:
using UnityEngine.Events;
public UnityEvent endEpisodeEvent; - In your
gameStatescript component press + button to add an event to the list. - Drag the agent's GameObject to the
endEpisodeEvent. - In the function field, choose
PlaytestAgentand assign theendEpisodeevent. - In a method that handle game over state in
gameStatescript add following line:endEpisodeEvent.Invoke();